iPhone Data Recovery


The easy 1-Click phone to phone data transfer to move data between iOS/Android/WinPhone/Symbian
Restore-iPhone-Data Products Center

 Android Data Recovery
The Easiest Android data recovery software to recover Android lost or deleted Files
 Phone Manager(TunesGo)
Best iOS/Android phone manager tool to manage your phone’s files in a comfortable place
The easy 1-Click phone to phone data transfer to move data between iOS/Android/WinPhone/Symbian
iOS Toolkit
A full solution to recover, transfer, backup restore, erase data on iOS devices, as well as repair iOS system and unlock iPhone/iPad.

Android Toolkit
All-in-one Android Toolkit to recover, transfer, switch, backup restore, erase data on Android devices, as well as remove lock screen and root Android devices,especially Samsung phone.
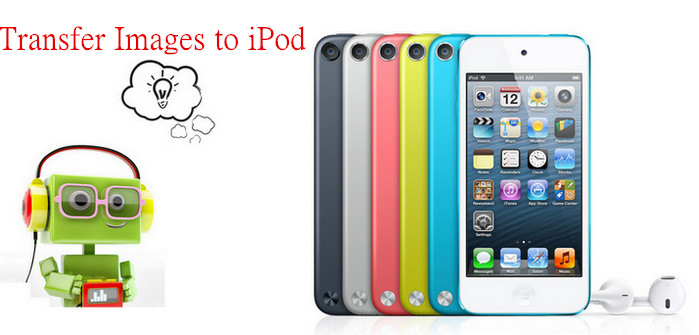
iPod are always used to listen to music anytime or anywhere you like. iPod touch looks like iPhone but is shorter and thinner than iPhone. Users can get full experience of using iPhone from iPod touch, except for making phone calls. Many people use iPod touch, iPod nano or iPod classic to download, save or view pictures on these devices in the daily life.
Adding photos to your iPod touch 4/5/6, iPod nano or iPod classic can be tricky for new users. The one thing about Apple products is that people just can’t connect it to a computer and copy files into it as we do in most of the phones and portable devices. In Apple’s case, you’ll need iTunes to do that job for you, but every time you transfer data through iTunes, it will overwrite the previous content, so it is not a good choice. Photos shot with an iPad are automatically stored in the Camera Roll location in iOS Photos app. On the other hand, when you sync photos from computer using iTunes, they are stored in a separate location (Photo or Video Library). But what if you wanted to store photos from your computer to the Camera Roll instead.
If you want to showcase your computer’s images on your iPod device, or want to sync images to your iPod device from iPhone/iPad/Android phone, how can you do that? In this tutorial we’ll explore some ways to transfer photos to your iPod device.
iOS & Android Manager is specially designed to manage all contents on your iPod, iPhone and iPad device. You’re able to to transfer photos between computer and iPod without losing any photo, or you can also sync photos from iPhone/iPad/Android to iPod device. Moreover, it is aimed at transferring music videos, books, TV shows and more to iPod device in one click. All transferred files are 100% same as the original one with no loss.
Just download the program with the below buttons.


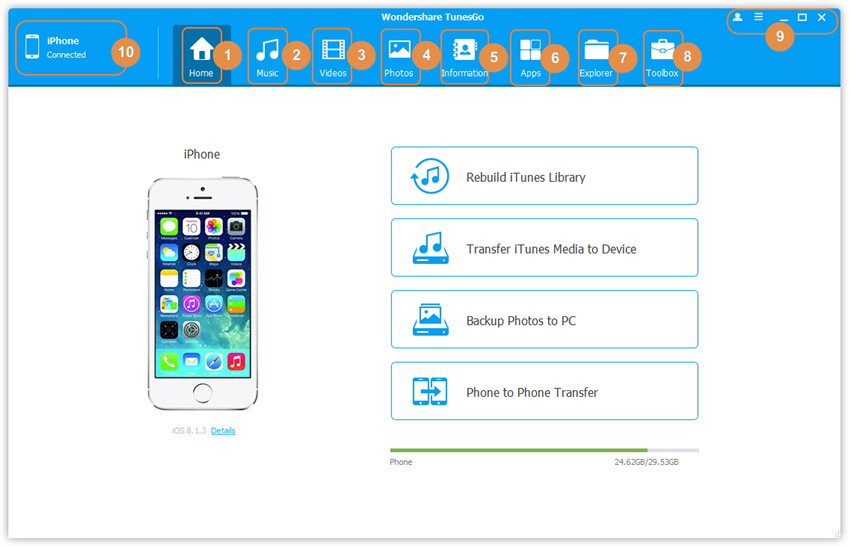
Step 1.Launch the Program on Your Computer/Mac
To start with, download and install the tool by clicking the above icon then luanch it. Next link your iPod touch, iPod nano or iPod classic to computer via its USB cable and you’ll see an interface like below:
Method 1. Transfer Photos Through Buttons
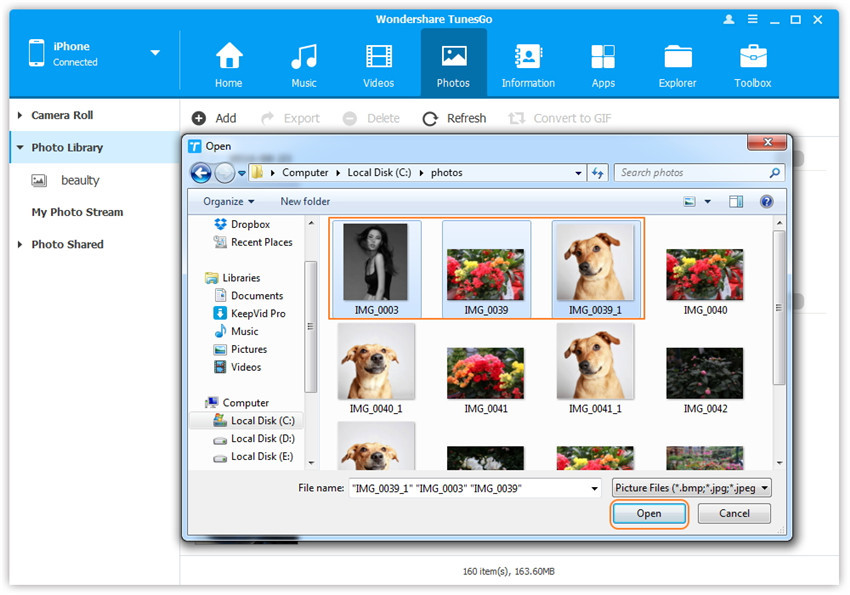
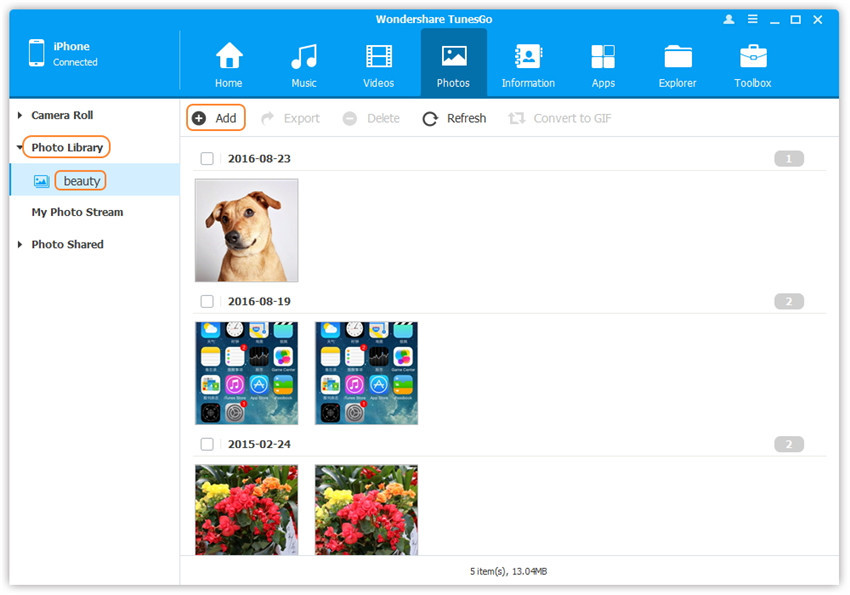
Step 2.Add Photos from Computer to iPod
Click on the photos tab, then select the specific option Photo Library. Please note that Camera Roll, Photo Stream and Photo Shared are not available to add photos.

Step 3.Transfer Photos from Computer/Mac to iPod
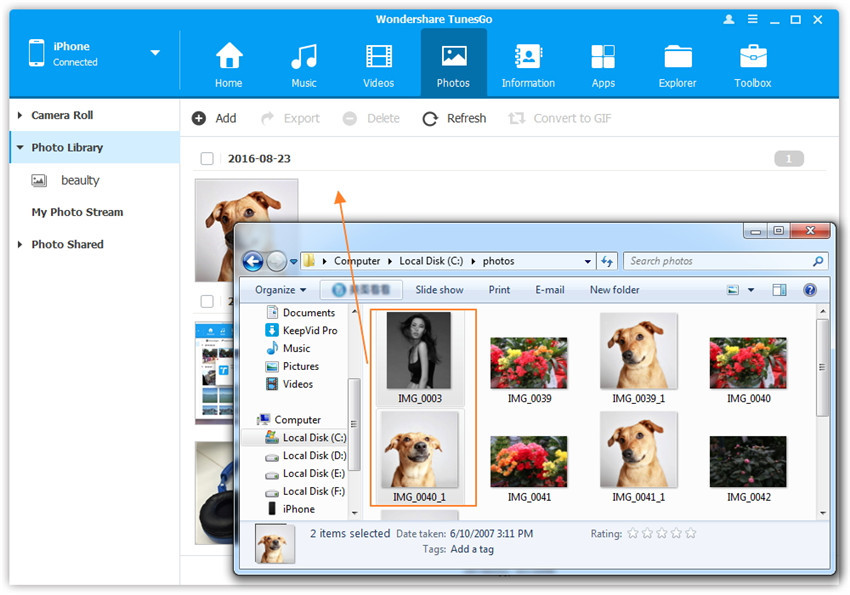
After that, add files option allows you to select photos one by one and Add folder will Add complete folder. You can choose the one you like.

After selecting Add Folder locate the path where your pictures are available on computer and click on “Open” button.
Method 2. Transfer Photos to iPod by Drag and Drop
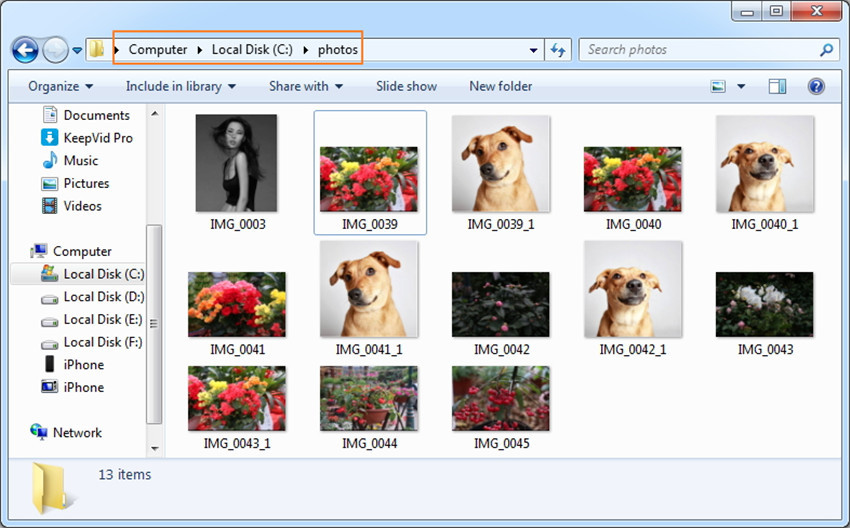
Step 2.Find Photos on Your Computer/Mac
Find and open the photo folder on your computer or Mac which includes the photos that you want to transfer to iPod device.
Step 3.Export Photos to iPod from PC by Drag and Drop
Later, click on the photos tab and go to the Photo Library option. Drag and drop the selected photos from your PC or Mac to the Photo Library window of the program.
Either of two method above, you can select to add photos to one of the photo albums under Photo Library.
In order to sync pictures from iPod to computer/Mac, the iOS & Android Manager program offers iPod users with deifferent methods, the following are the detailed steps:
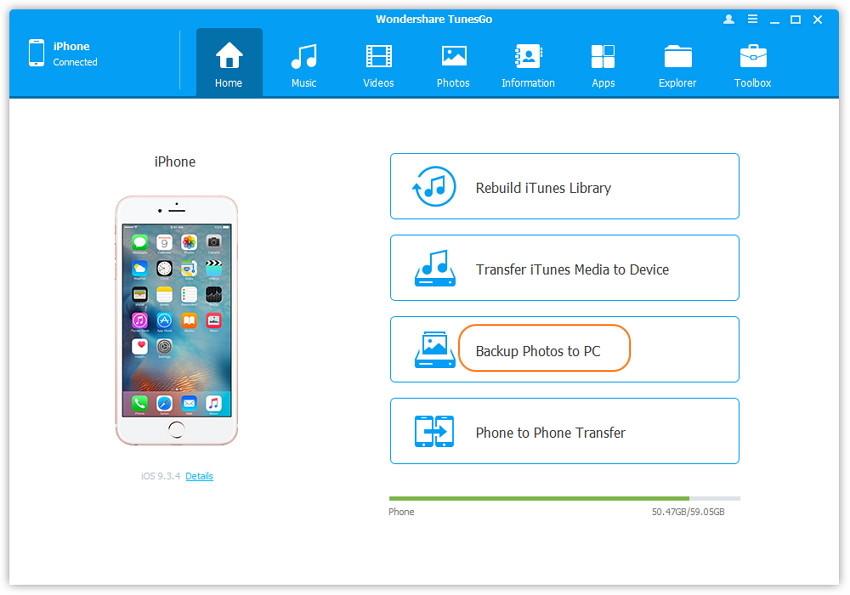
Method 1. Backup Photos from iPod to Computer/Mac in 1-Click
Step 2.Backup Photos to Your Computer/Mac
As a Windows PC user
You can transfer/backup pictures from iPod to the computer/Mac by clicking the “Backup Photos to PC” button.
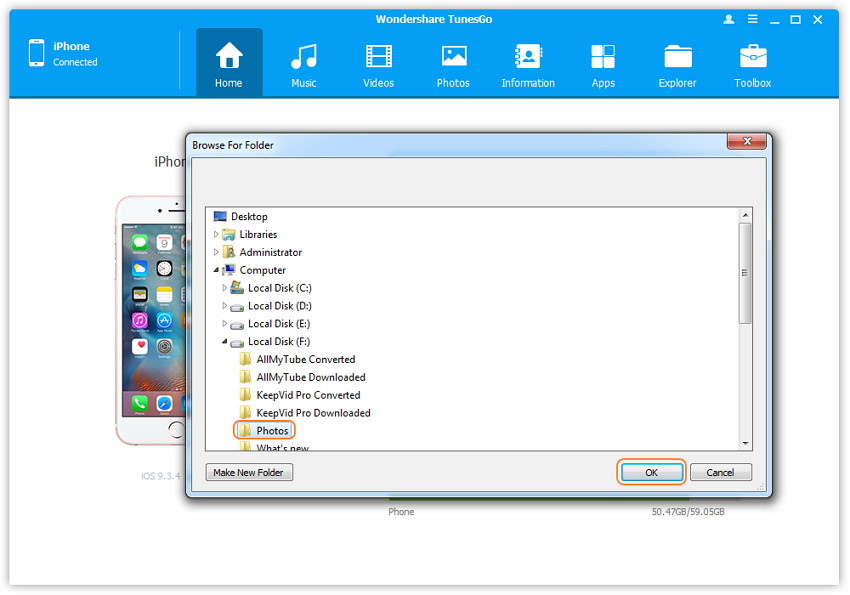
Next, browse and select the destination folder for photos, click “OK” to start the export.
As a Mac user
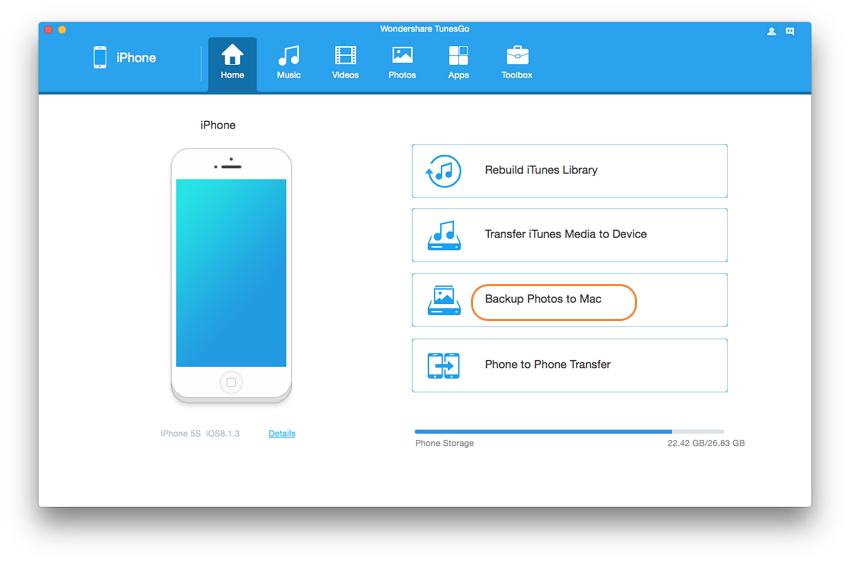
Click “Backup Photos to Mac” option on the main interface.
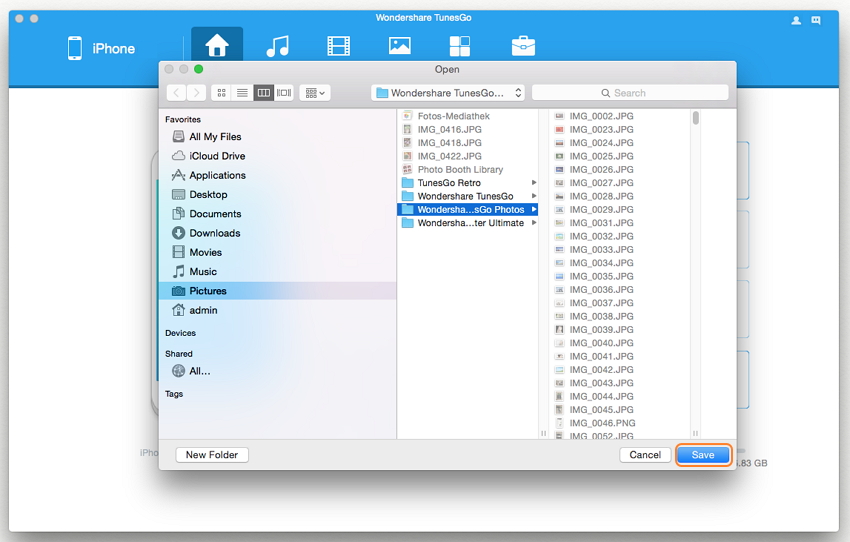
From the pop-up window, browse and select the destination folder for photos, then click “Save” to start the export process.
Step 3.Successfully Export iPod Photos to PC/Mac
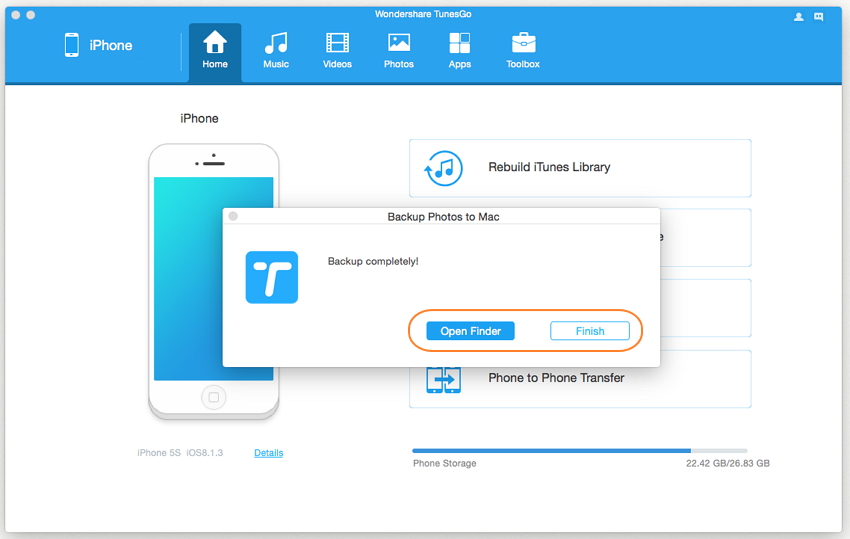
Finally, click “Open Folder” to see the exported photos on the selected path of your computer, or you can click “Finish” to close the dialog.
Method 2. Transfer A Part of Photos Through Buttons
Step 2.Select Photos Tab
After connecting your iPod to PC, you can tap on “Photo” icon at the top of the main interface and you will enter the default photo type: Camera Roll.

a) Transfer Photos from iPod to Computer Selectively
Step 3.Export Photos from iPod to the Computer
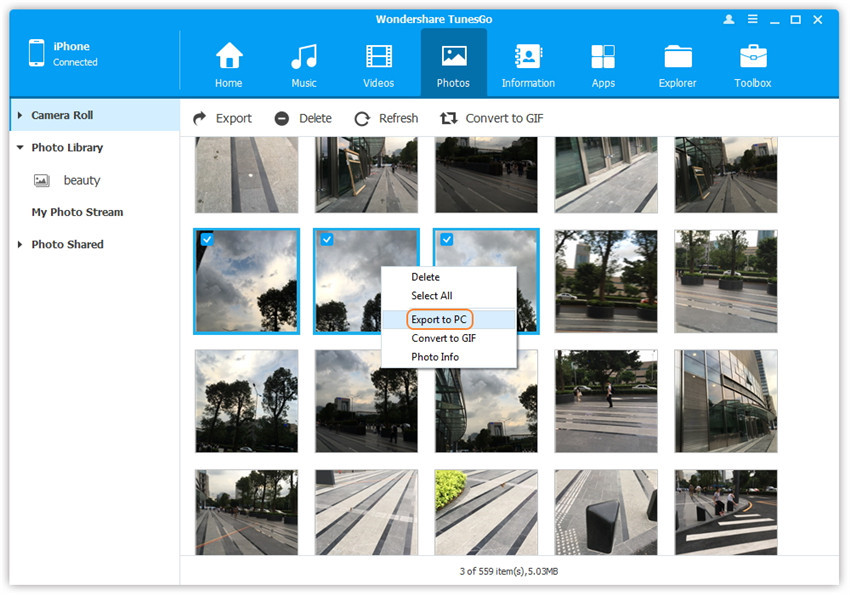
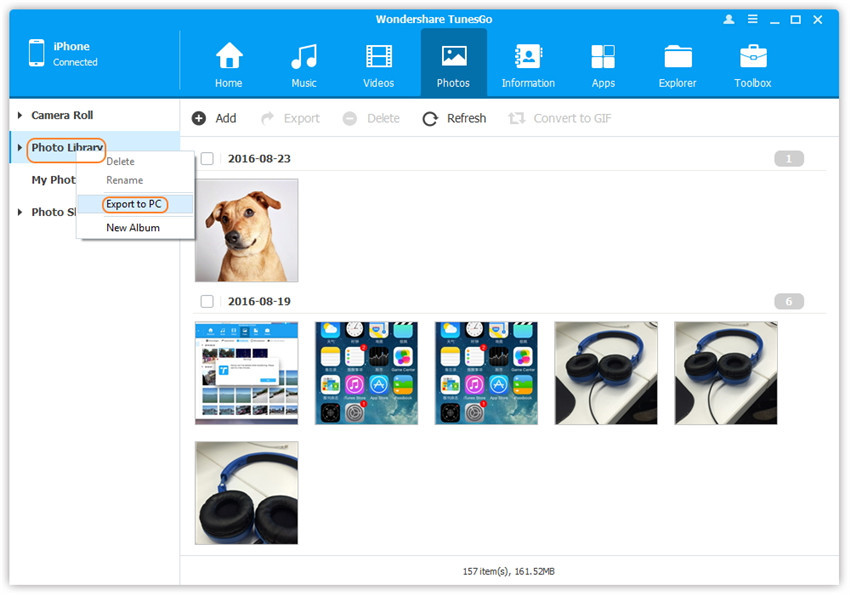
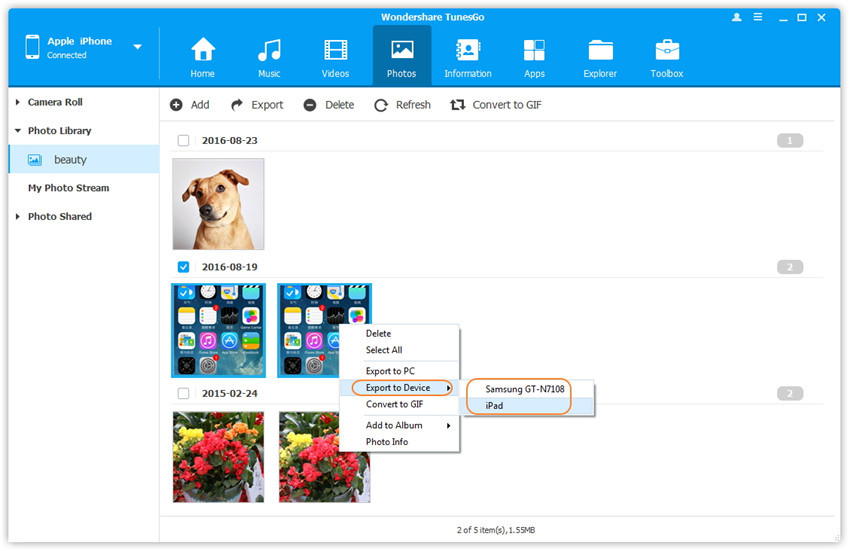
a. You can select a specific photo type under Camera Roll/Photo Library/ Photo Stream/Photo Shared to enter the album window, then all the photos in this album will be shown on the right panel. Select which one you want and click “Export” > “Export to PC” from the drop down list.
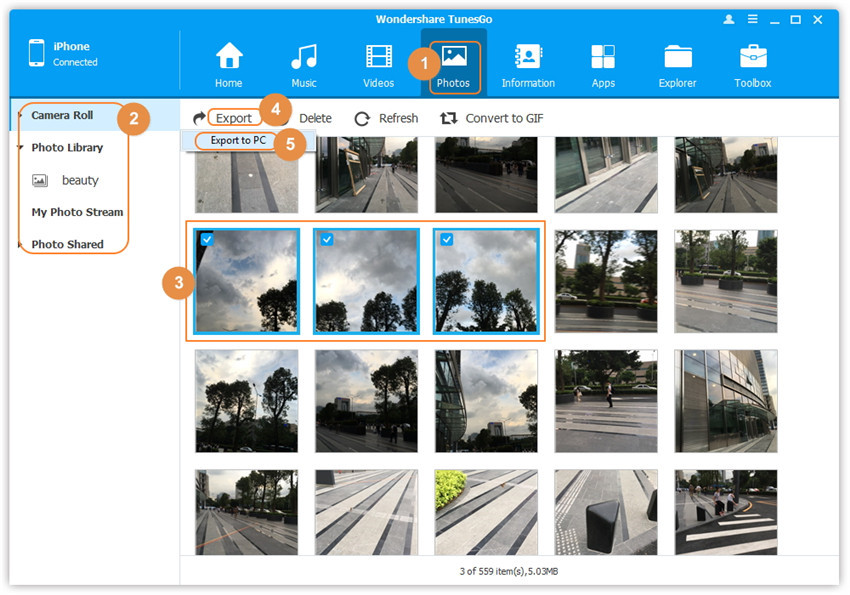
Or you can right-click on the selected photos then click “Export” > “Export to PC” button.
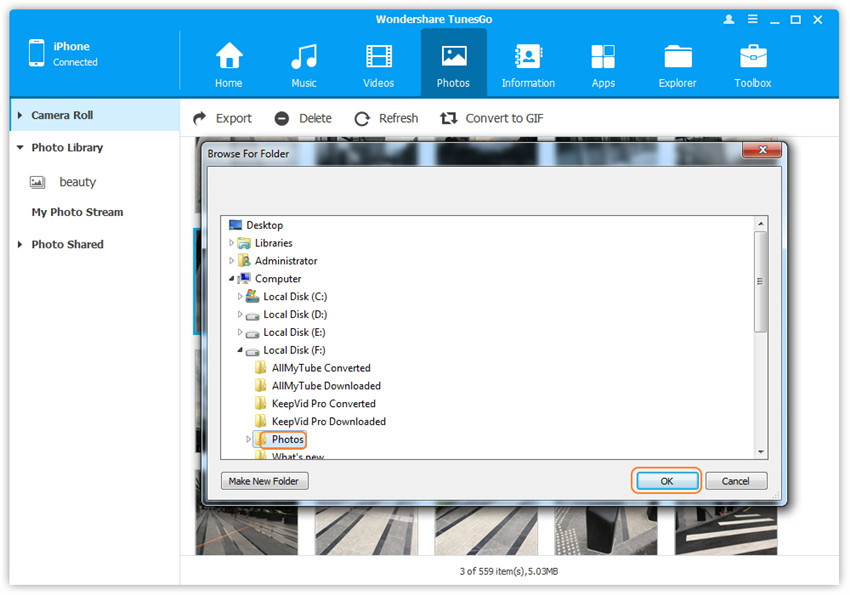
b. Browse and choose the target folder on your computer/Mac to export. And then click “OK” to start the export process.
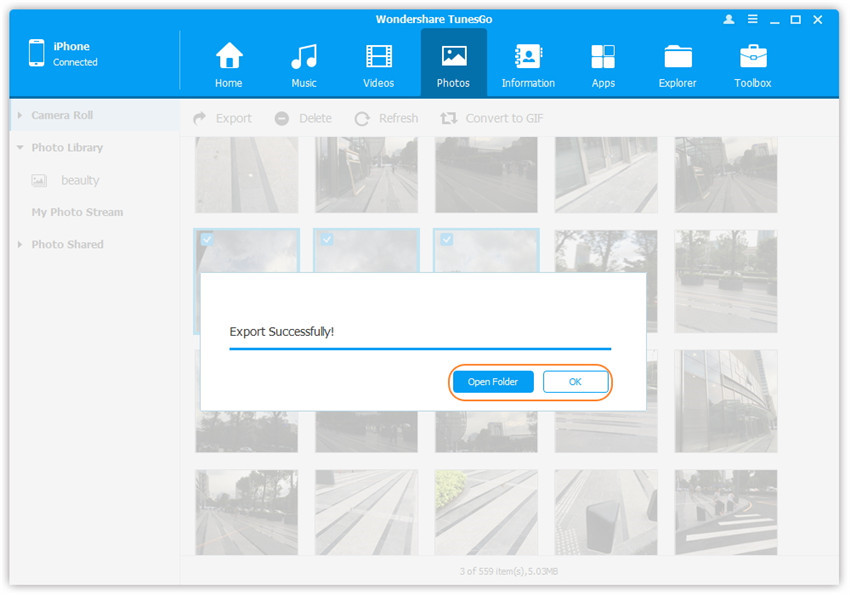
Step 4.Successfully Export iPod Pictures to Computer
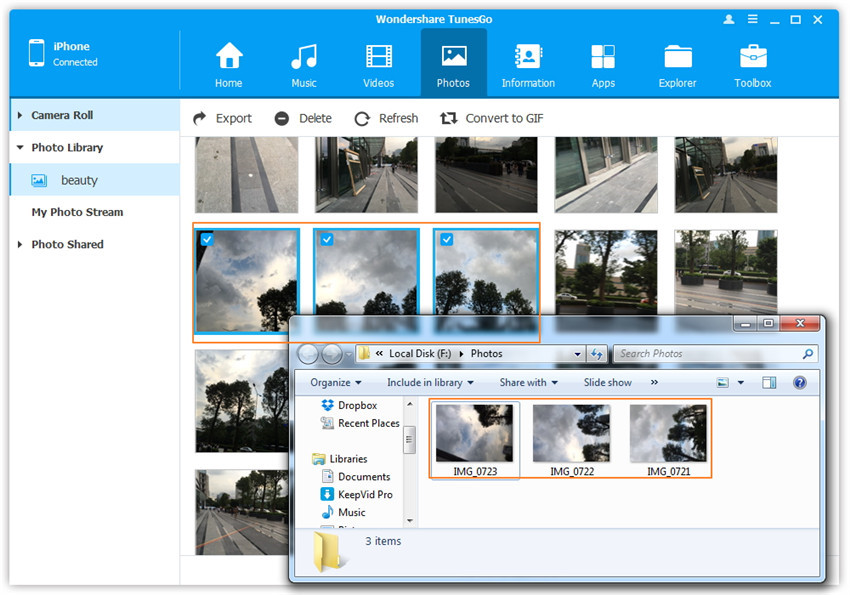
At last, you can either click “Open Folder” to see the exported photos on your computer or click “OK” to close the dialog.
Congratulations, you have successfully transferred iPod photos to your computer.
b) Sync All The Photos in One Photo Type from iPod to Computer
Step 3.Select A Specific Photo Type to Copy
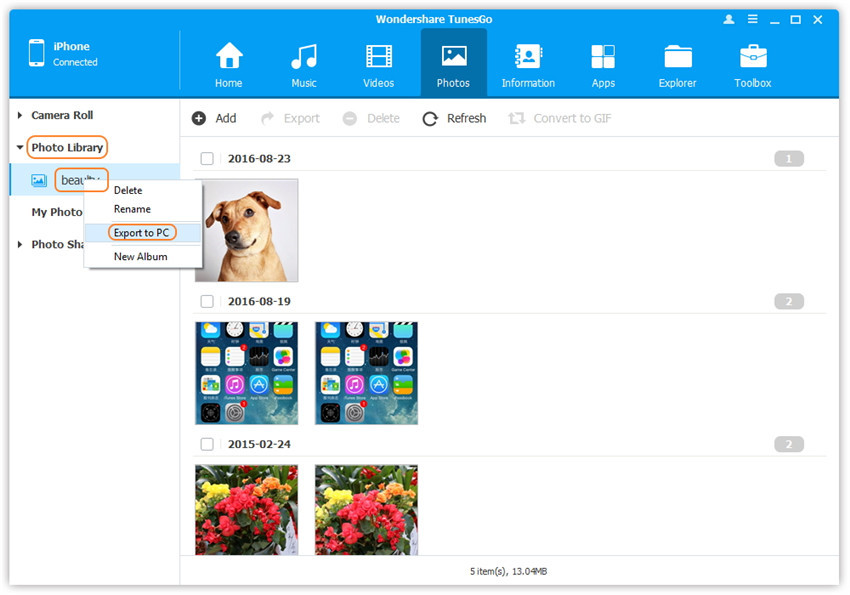
Select a specific photo type: Right-click on Camera Roll/Photo Library/ Photo Stream/Photo Shared, and choose “Export to PC” from the drop down list. Next, browse and choose the target folder on your computer/Mac to export.
c) Sync All The Photos in One Photo Album from iPod to Computer
Step 3.Select A Specific Photo Album to Sync
Select a specific photo album under Camera Roll, Photo Library, Photo Stream or Photo Shared: Right-click on it, then click “Export to PC” from the drop down list. Next to browse and select the target folder on your computer to export.
Method 1. Copy All Images from iPhone/iPad/Android to iPod in 1-Click
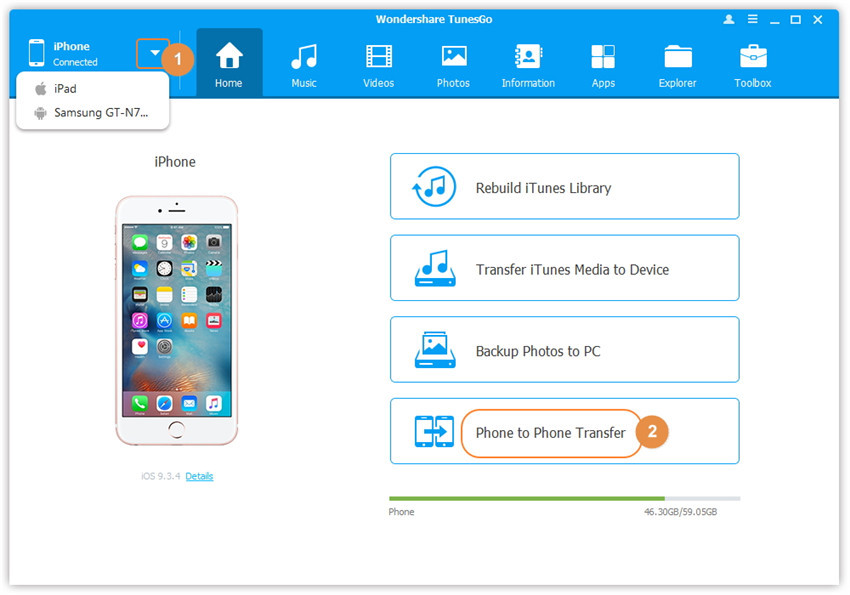
Step 2.Confirm Your Source Device
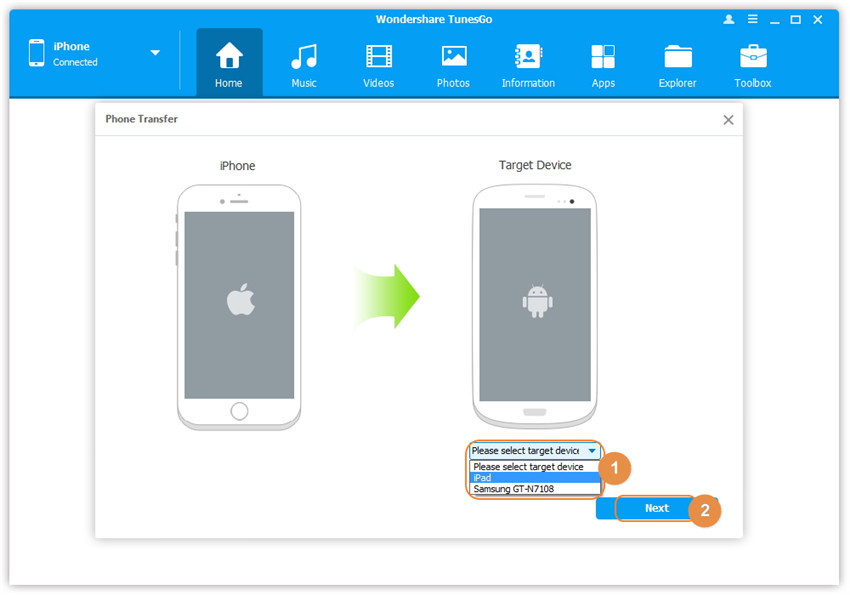
After connecting your iPhone/iPad/iPod/Android devices to the same computer, you need to confirm your source device. And click “Phone to Phone Transfer” option on the main interface. Then a new window will pop up.
Step 3.Select Your iPod as the Target Device
From the pop-up window, select the target device iPad from the drop-down list and click “Next” button to go on.
Step 4.Transfer Images from iPhone/iPad/Android to iPod
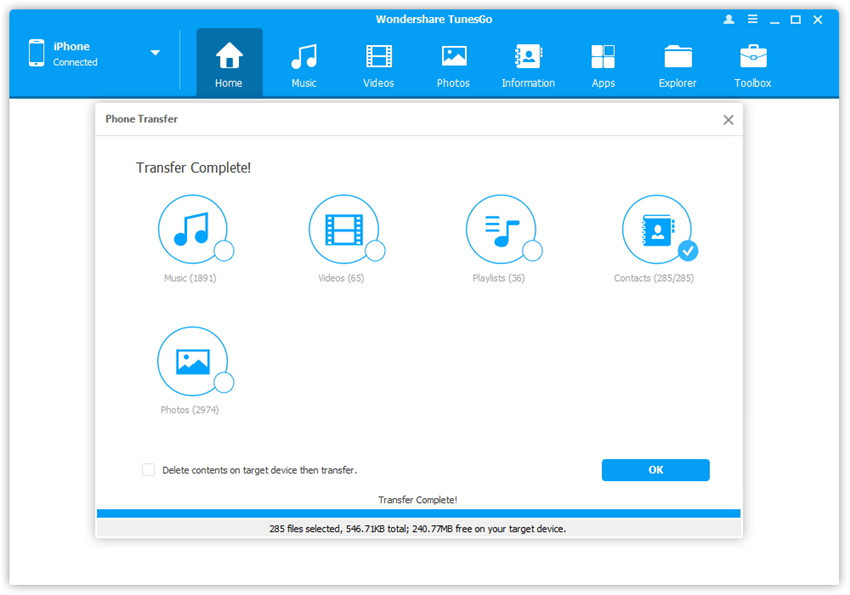
Everything on your iPhone/iPad/Android that can be transferred are checked, such as Music and Videos, Playlists, Photos, Contacts( Note: Contacts are not supported by Mac version). You can choose “Photos” and click Transfer button to start transferring.

In the whole transfer process, do not disconnect either of the devices. When the transfer completes, click “OK”.
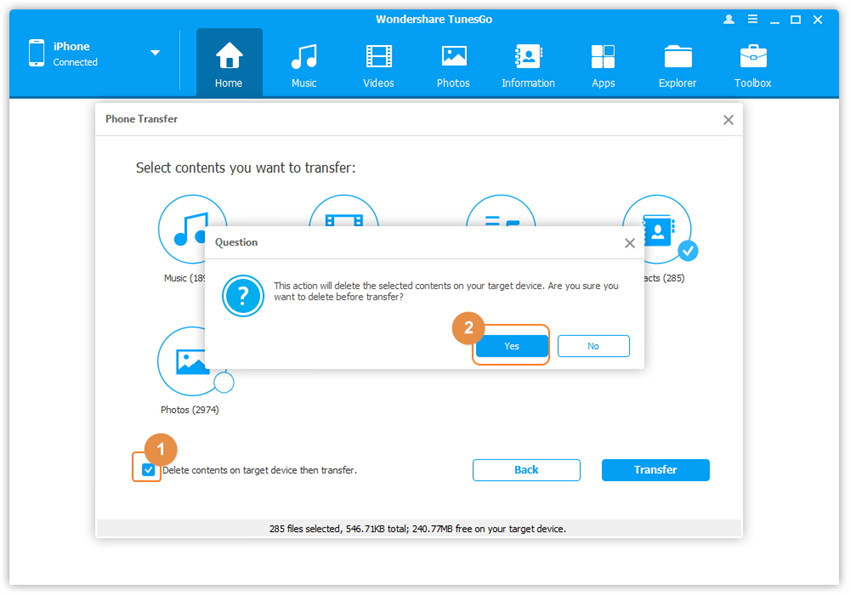
Note: For Windows version, you’re enabled to tick the option: “Delete contents on target device then transfer” before transferring. By default, the selected contents on the target device will be deleted fristly before the transfer.
Method 2. Selectively Transfer Images from iPhone/iPad/Android to iPod
Step 2.Select Images and Transfer to between iPod/iPad/iPhone/Android Devices
After linking the iPod/iPad/iPhone/Android devices to the computer/Mac, makre sure which phone is your source device, and click “Photos” at the top of the main interface, then select a specific photo type: Camera Roll/Photo Library/ Photo Stream/Photo Shared( Camera Roll is the default type). Later, select one specific album under the photo type to enter the album window, tick the photos which you want to transfer from iPhone/iPad/Android to iPod. At last, click “Export” > “Export to Device” > choose iPod device.
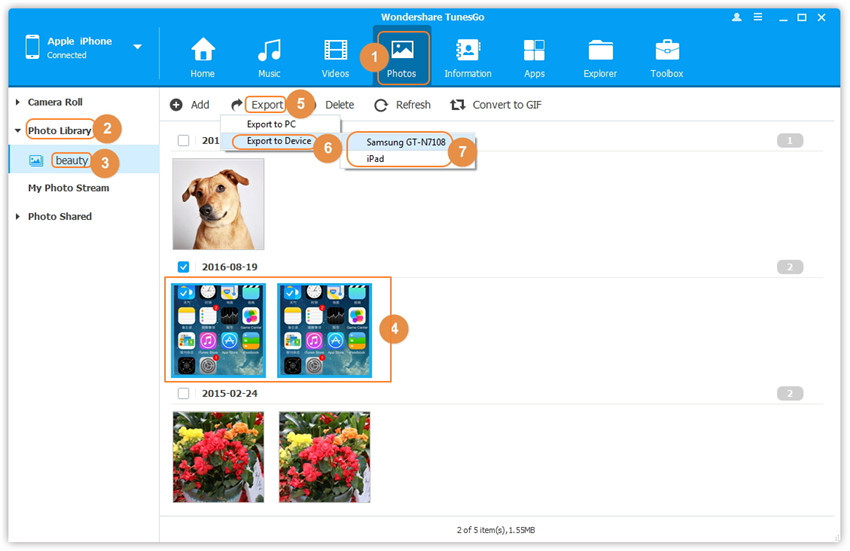
Another quick way, you can right-click on the selected photos and then select “Export to Device” > select your iPod device.
Related Articles
How to Transfer Music to iPod (touch) from PC/Mac Computer
How to Transfer Photos from Computer to Google Pixel/Pixel XL
How to Transfer Video to Samsung Galaxy S7/ S7 Edge
How to Delete Songs on Your iPhone iPad iPod
comments powered by Disqus